Showing posts with label bblogger. Show all posts

In 2018 acne bblogger beauty bloglovin fblogger followback followforfollow journey lblogger may skin thegirlgang update youtube

The beginning of a long journey...


It's been half a year since I last wrote anything on here. I stopped using my Twitter and kind of fell out the blogging band wagon. But as I'm about to start a skin journey I asked people on Twitter if they'd like me to document it and surprising people did! 

Let's start with a bit of background. When I was in secondary school I was quite lucky to have pretty good skin. I had the odd spot here and there but generally felt super secure and confident about how my skin looked without makeup. 

When I started university, just before my 19th birthday I began noticing how my skin was changing. Not only was I a hell of a lot spottier than previously, I also started getting dry patches and really oily patches across my t-zone. 

I started wearing a lot more make up. I know as you get older you can become much more self aware but it really started to get me down. As the year went on I finally went to my GP. It took me a lot to do this. With someone who suffers from panic disorder I was terrified I was being over dramatic as everyone always told me my skin looked fine.

But then things got worse... My GP used the words 'cystic acne' which basically describes exactly what I was going through. Hard, solid, sore lumps under the skin that just would not shift!! Annoying. After going to the GP the doctor prescribed me a strong Benzoyl Peroxide cream. The first few weeks were completely fine but all of a sudden my skin switched. It was the sorest it had ever been, it was super red, dry and flakey and absolutely everything made it burn BAD. 

This was one of the lowest points. I cried at the thought of going to work (customer service = serving customers all day) because I was so self conscious and I couldn't put anything on my skin to even attempt covering the huge red spots I had all over my face. I felt like I didn't want to go out because someone might comment on my redness and yes, people did. I was called greasy, spotty and even asked if I'm sun burnt and it hurt me. 

To top it all of last year I was told I also had rosacea which totally made sense because all across my cheeks, nose and chin are completely red 24/7 and spider veins began popping up. FAB. 

Of course, back to my GP I went. I basically cried and cried until he finally said he'd refer me to a dermatologist. After waiting nearly 7 months and having cancelled appointments I have finally had my first ever proper dermatologist appointment!!!! YAY. 

I've been told I'll be put on roaccutane which is something I have done a hell of a lot of research on and I won't lie I'm both terrified but buzzing about the possibility of having nice skin!!! I have had a blood test and will be finding out in the coming week what's going to happen next.

I'm totally up for blogging about my experience on roaccutane and might even do some sit down or vlog style videos about how I'm finding the whole skin journey. 

Watch this space!!!

*Disclaimer* Posting about my acne and the struggles I've faced with my mental heath is something that takes a lot to do and I would appreciate it if you could respect that. Please remember that everyone has different ways of going through/dealing with these sorts of things

Read More

Share Tweet Pin It +1

0 Comments

In 2017 amsterdam autumn bblogger fblogger followback lblogger lfl lifestyle OOTD thegirlgang travel travelblog winter

Amsterdam OOTD // Weekend Edition


Hello lovelies,

Since being back at university I haven't been blogging. Not because I don't want too but I've actually become head of fashion & beauty for the university magazine, meaning that I've been up to my eyeballs in writing and editing articles... Alongside a mountain of work! But, I've started a module all about blogging and I remembered just how much I missed my blog so what better way to restart than to post my first outfit of the day (OOTD) post from my trip to Amsterdam. 

I spent the weekend in Amsterdam for my boyfriends birthday (giving him the lovely job of taking millions of photos of me) and thought I'd take snaps of what I was wearing as lately I've been really into wearing and trying new looks. I'll do my best to link the original items but alternatives might be in place as I do a lot of my shopping in vintage shops here in Leicester. 

Enjoy!

Day 1- From airport to Amsterdam

Finding something comfortable but stylish for your first day can be a bit of a mission but culottes are perfect! They can be dressed up but also dressed down so I decided to pair them with some Stan Smiths and an oversized washed out denim jacket.
Denim jacket (Similar) 

Day 2 - Red accents

Red has swiftly become my all time favourite colour and this beanie I found in Bershka Amsterdam adds a pop of colour to a relatively monochrome outfit. I've also been loving my denim skirt and find pairing it with an oversized hoodie can keep you warm as well as comfy. Not sure you've noticed yet but comfort for me is key!

Belt 

 Day 3 - Oversized everything

T-shirt dresses and band tee's have been in all summer and have been coming into the colder months as a layering option. I found pairing this dress with another oversized item of clothing worked really well. The jacket is an old school vintage Nike waterproof that adds some colour to the outfit. Every person in the world seems to own a pair of Vans and I don't blame them. These shoes are go with every single outfit ever and are super comfortable! 

T-shirt dress (similar)
Nike waterproof (vintage shop)
Vans  

I used the same bag throughout the trip but unfortunately I brought it so long ago and abroad that I have no idea where you could find it from! If any of you know any designs similar please comment below I'd love to be able to find an alternative! 

Love B x


Read More

Share Tweet Pin It +1

0 Comments

In 2017 bblogger beauty bloglovin fblogger followback followforfollow lblogger lfl palette product review september skin thegirlgang urbandecay

Urban Decay Naked 2 // Review


Hello lovelies!

I've been meaning to do this post for a crazy long time but just never got round to it! I was originally going to do a first impressions, but after using this palette constantly for the past six months I thought I'd switch it up and do a full review!

I've always had so much love for Urban Decay and was desperate to get my hands on one of their palette's. I opted for the 'Naked 2' which is available HERE for £39.50. It comes with 12 shades that includes both matte and shimmer finishes. It also has a doubled ended brush called 'Good Karma shadow/crease' and is exclusive to this palette. I absolutely love this brush and actually use it all the time!

Swatches 1.

Swatches 2.

From the swatches its already quite clear to see that they are really pigmented and from the photo above I only swiped the shade once. On top of this they blend beautifully. I find I use a fluffy brush to blend out and only have to use a small amount of colour. I've already been using this palette for about half a year and haven't touched pan on any of the shades yet! Amazing.

 The only colour I find a bit pointless in this palette is the first shade called 'Foxy'. It's a banana type shade which I love but it just doesn't show up much on my skin tone. However, saying this I do find this one to be really good for a matte base colour or if you want a more natural look on your eyes.

My absolute favourite colour in the palette has got to be 'Chopper'. It's a beautiful sparkly copper colour and I always find myself going back to this shade and doing an orangey/copper look.

This palette is so versatile. With such a range of different colours I can do smokey eyes, copper eyes and even some purple. I definitely recommend this if you're new to makeup as a kind of beginning high end palette because it's so easy to apply and doesn't leave a lot of fall under the eyes.

I can't wait to get my hands on some more Urban Decay make-up. Let me know in the comments your favourite palette at the moment!

Love B x


Read More

Share Tweet Pin It +1

0 Comments

In 2017 bblogger fblogger followback followforfollow lblogger lfl lifestyle positivepost september summer thegirlgang university

University tips // Managing time!

Hello lovelies,

This is my last university tips blog post and will be all about how to manage your time when away at university. If you haven't seen my other two posts about preparation and saving money then please go check them out!  *PREPPING AND SAVING MONEY*

When you head of to university managing your time can be quite stressful. You have to study, make time for yourself, socialise and sleep. So, here are a few tips on how to help and mainly how to focus on your studies.

1. Avoid distractions
University is just full of distractions but be strong and try to stay away if you know you have things that have to be done. The best way to do this is to use your university facilities such as going to the library or a classroom. By setting up in a quieter environment you can focus way better!

2. Make a schedule 
When you have tonnes to do I find making a schedule for the week breaks everything up much easier and it doesn't seem so daunting. You can then start crossing things off as you do them and that shows you actual progress which can often be motivating.

3. Give yourself some me time
Even when you have loads to do you need to give yourself some time to either be alone or socialise and see your friends. By doing this it allows you to have a breather and relax for a bit. As important as studying and stuff is it's so important to give yourself some time off. Your body will thank you!

4. Prep and plan
Don't leave things till the last minute!!! By prepping and planning you give yourself some time to overlook everything that needs doing and also reduces stress massively. Planning can help you write down any ideas and really boost your motivation.

5. Prioritise 
Make sure you separate what needs to be done and what you want to be done. By prioritising things you can get the most important things done first. I normally prioritised by using the dates things needing doing so that everything was done in time. 

Again, even if you aren't going to university you can always use these tips to manage your time if you are at school or college. Make sure you go check out all of my other university tip blog posts here and here and good luck for anyone going away to university!

Love B x

Read More

Share Tweet Pin It +1

0 Comments

In bblogger blog bloglovin fblogger followback followforfollow happiness lblogger lifestyle positivepost september summer thegirlgang university

University tips // Saving money!

Hello lovlies,

This is the second post for my three post series all about my university tips. If you haven't seen my first post you can read it here. This one will be talking about probably one of the most important things to do when going off to university. SAVING MONEY.

Student finance is great but they don't always give you a lot to live on and receiving a low amount of money can make leaving home so daunting. But... even though I can't offer real money there are loads of ways that you can save some dollar!

1. Budget!!!
Budget your money and stick to it. Remember you're a student now. By giving yourself a budget it means you can see exactly what you need and how much everything will be. You can also take note of what you are spending your money on either weekly or monthly and if you are over spending you can look back and see what you need to cut out.

2. FRESHERS
 Don't spend your entire bank during freshers, you'll have at least 3 more months until your next loan and living on pot noodles and toast isn't fun. We all know that having a huge lump sum of money dropped into your bank account during freshers is super tempting but give yourself a budget and don't go crazy. 

3. Forget about your car
Driving is great and I loved my car but the fact is you won't need it. If you have a car the best thing to do would be sell it. This way you'll make some extra cash! Normally when you go away to university everything is a walkable distance away. 

4. Student discount
Tonnes of places offer student discount now. You can either buy an NUS card or use the unidays app. Whenever you go somewhere all you need to do is search to see if they offer discount or simply ask. Both of these offer discount on things such as shops, restaurants and even hotels.

5. Get a student bank account
Not everyone wants to use an over draft but loads of banks now offer student accounts that give you an interest free over draft. (Basically you can borrow money and not have to pay any interest on it.) Even if you don't ever have to use your overdraft it's much safer to have it incase anything does happen. Just remember, don't be tempted to start spending it all on things you really don't need. *Clothes... makeup... ect... *

I used all of these tips in my first year and will most probably be using many of them again. You could even use some of these if you aren't going to university but just want to save some money. Keep an eye out for my last post about saving money and you can read my previous post here. I hope they help and a huge good luck to anyone going away this month to university!

Love B x

Read More

Share Tweet Pin It +1

0 Comments

In 2016 bblogger bloglovin fblogger followback followforfollow lblogger positivepost september thegirlgang university

University tips // Prepping!

Hello lovelies, 

This time last year I was busy running around like a headless chicken trying to get everything together before I went away to start three years in Leicester for university. I found heading off to university both daunting and exciting. I went out and brought every single type of saucepan and started stocking up on essentials such as pasta. 

So, before you go crazy in Ikea I though I’d do a three part blog post series with some tips to help you before going away to university including prepping, saving money and how I found it best to manage my time. 

Todays post will be all about preparing for university and some advice on how to do so! Hopefully some, if not all of these tips will help make university life a little easier!

1. LISTS! 
Writing lists of things you need to get will make your lives ten times easier. You can write up your own or go online and find a pre-made one. You can write down different categories like things for your kitchen, bedroom and bathroom. I found making a list made me not forget anything essential.

2. Colour themes
Now this one may seem weird but having some kind of colour scheme for my bedroom made it so much easier when I was out buying bits and bobs for my room. It stopped me from going crazy and buying absolutely everything and instead made me look out for some nicer more suitable items. I also found by having a coloured theme for my room I was able to make it my own and it really helped with the home sickness. 

3. Get a REAL email address
By now I’m assuming lots of you have an email address that isn’t something like ‘princess2017’ because no lecturer or job application will ever take you seriously! Having a professional looking email address that you can contact your university on is so much easier. Everything will be in one place for you to find things and you’ll be able to use it for things in the future such as work experience or placement. It’ll also make organising things 10x easier as well. You’ll be able to link everything together on your computer and phone.

4. Facebook groups
Now I’m not a huge Facebook fan and I rarely use it other than to speak to family but during this time of year Facebook is full of university group pages that you can request to join. By doing this you can meet so many other people who are in the same boat as you and you can begin to make friends with people. From here you can even find some of the people on your course or who you may be living with if you’re staying in halls. I found this super helpful and actually met some of my best uni friends this way!

5. Get involved!
When you arrive at uni your first week will be a blur. There will be fresher’s fair, loads of events and you’ll be meeting so many new people. My best tip would be to get stuck in. Talk to new people and get to know your surroundings. I found starting in my halls was best and as I became familiar with everything I started venturing out around campus. Fresher’s fair is also something to get involved in. You’ll be given so many freebies and also get a chance to look at the different societies. Doing all of this will make making new friends easier and make university life easier too!

For anyone off to university this month then good luck! Just keep in mind that everyone is in the exact same boat as you and you'll be fine.

Love B x

Read More

Share Tweet Pin It +1

0 Comments

In 2017 august bblogger blog bloglovin fblogger followforfollow france holiday lblogger summer thegirlgang travel

Photo diary // South of France

Hello lovelies,

Whilst I am writing this I should be unpacking my mountain of holiday clothes but the thought of all that washing is just too much! Yesterday I got back from my family holiday to Saint-Aulaye in the south of France so I thought I'd do another one of my photo diary posts as my others have been really popular with you all. 

Saint-Aulaye is a beautiful little village in the countryside of France. Luckily the weather was absolutely beautiful and I was able to explore the surrounding villages.  I also made sure I took loads of outfit pictures so they will be coming soon in another blogpost all about my outfit choices throughout the holiday!

Hope you enjoy my snap-shots! 


An adorable snack-shack in the centre of Saint-Aulaye which made the most amazing crepes.

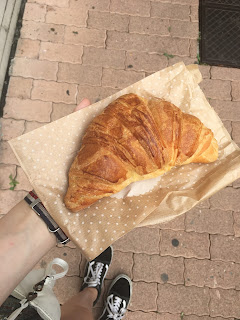
Found a tiny little family run bakery. The owner made these amazing croissants. 


Riberic had a chocolatier that sold these macaroons.

They also sold loads of different sweet treats!

Outside they had an old fashioned ice cream cart that sold loads of different ice cream flavours.

A beautiful snap of Saint-Aulaye's main street.

One of the villages we drove through on our way home.

Saint-Aulaye had a huge river that they decided to make into a beach.

One of the surrounding villages called Riberic.

Me and Ciar by the river.

The street just outside of Saint-Aulaye.

My happy little sausage dog enjoying her first ever swim!


Another beautiful scenic photograph in our village. The photos do not do the place justice.

*Disclaimer* All photos were taken on my iPhone so sorry for the not so great quality.

Love B x


Read More

Share Tweet Pin It +1

1 Comments

In 2017 august bblogger beauty beautybay beautyset blog bloglovin fblogger lblogger lifestyle lip lipstick makeup product review twofaced

Purple Lips // Too Faced Melted Metal


Hello lovelies,

I've never had the chance to try any of 'Too Faced' make up ranges but was lucky enough to find these two melted metal lipsticks in my local TK-Maxx in the shades Jelly and Violet. Both shades are purple toned and are 100% statement lips. I definitely recommend popping into TK-Maxx to see if they have any high end products in stock because I picked up these for under £10 and they normally retail at £19 and can be found here.


The lipsticks are a liquid version of a metallic lipstick and come with a sponge applicator on the end of the tube for an easy application. They leave lips looked glazed which is something not everyone loves but I think looks so 90's and love it! Also, because of this they don't dry out the lips at all and feel totally comfortable. 


Top: Metallic Violet
Bottom: Metallic Jelly

Both of these shades are really pigmented however I find with the shade 'Violet' I do have to reapply a few times throughout the day because it is a lot lighter looking on the lips than in this swatch. The bottom shade lasts so much longer because it leaves a more subtle stain if applied just once. 

I am in love with purple lips at the moment! Has anyone else tried any Too Faced cosmetics before? I'd love to check out more of their stuff <3

Love B x 


Read More

Share Tweet Pin It +1

2 Comments

In bblogger beauty beautybay bestof blog bloglovin fblogger followback july makeup morphe mua palette

Review // Morphe 35OM Palette


Hello lovelies,

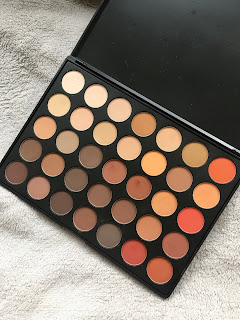
I have spent sooo long waiting for the Morphe 35OM palette to come back in stock at BeautyBay and finally I got my hands on it so I thought I'd do a first impressions post.

This palette is an all matte version of the 35OM which is an even bigger sell out! I much prefer a matte eyeshadow look and found that I didn't have many matte palettes so though I'd give this one a go. The burnt out colours are so in at the moment and I've already got so much use out of it.


The colour pay off is absolutely amazing so I think this palette is going to last a really long time. On top of this all of the colours are easily blendable and create some gorgeous looks. I especially love the right hand section of the palette because the orangey/red colours are my favourite.

For only £22.00 this palette is perfect. Morphe do a variety of palettes and I can't wait to try out some of the others.

Has anyone tried this palette or anything else from Morphe? Would love to read about them in the comment section below.

Love B x 


Read More

Share Tweet Pin It +1

4 Comments

In 2017 bblogger beauty blog bloglovin fblogger followback july lblogger lfl lifestyle nivea thegirlgang

Skincare // Nivea face range

Hello lovelies,

Exam season is finally over and done with and now I actually have some spare time to start blogging again. As someone who struggles with acne and finds it difficult to come across products that don't set my skin off I thought I'd kick off with a skincare post! (Basically telling you how much I friggin' love Nivea atm)

I've always used Nivea since I was a teen because it was the only brand that didn't make my face breakout into a billion spots. Ever since I've loved trying out their new products so I thought I'd round up every Nivea product I use daily and talk through how amazing I've found them to be.


Nivea Daily Essentials Double Effect Eye Make-Up Remover - £3.89
If you're like me and you wear waterproof mascara then this ones for you! I absolutely swear by this eye make-up remover. I hardly have to use any product to remove my mascara and it doesn't take a whole lot of rubbing either. Not only does it leave your eyelids squeaky clean but it also doesn't leave that horrible greasy feel some removers do.

Nivea Daily Essentials Sensitive Cleansing Milk - £3.69
Sometimes if I'm only wearing light makeup I prefer using this cleansing milk over micellar water because it isn't as harsh on my skin. I massage this into my skin like a moisturiser using my finger tips and then wipe off with a large cotton pad. It removes my make-up really well and also leaves my skin feeling hydrated.

Nivea Purifying Gel Face Wash - £3.59
For the past 7 or so years I have tried many different face washes and I've never found one I have loved and re-purchased. But that has all changed. This face is really good at targeting blackheads and purifying the skin. I find using this both in the morning and at night leaves my skin feeling healthy and clean.

Nivea Regenerating Night Cream - £4.05
This night cream is intense. It has a very thick consistency which I personally love. I find when I massage this into my skin before bed I wake up with my skin feeling so soft. I would definitely recomment this if your skin is in need of a smoothness boost!

Nivea Lip Care Essential - £1.65
This lip balm is one I have been repurchasing for years! It has a gorgeous scent and doesn't feel too heavy on the lips. It hydrates my lips and leaves them super soft. Especially in the colder months. Its simple uncoloured balm means it is perfect to just chuck in my bag.

Overall I have been loving using the Nivea skincare range and can't wait to get my hands on some of their other products.

I hope you all are loving the new blog theme and layout and any comments below would be greatly appreciated. Feels so good to be blogging again!

Love B x

Read More

Share Tweet Pin It +1

2 Comments

In 2017 bblogger beauty bloglovin bronze bronzer fblogger followback followforfollow lblogger lfl review sumer tan thebodyshop thegirlgang

Gettin' my glow on // Honey bronze


Hello lovelies,

Like any twenty-year-old girl I absolutely love having a tan but as much as I'd love to hop abroad a catch a real one that just isn't possible. This is where the trusty bottle of fake tan comes out but to be honest I've just never found one that leaves me with a glowing tan. That was until I saw the Honey Bronze range from The Body Shop...

 With the sun finally making an appearance and The Body Shop having a 3 for 2 offer I thought it would be the perfect opportunity to get my glow on and try out some of their products. I picked up the Shimmering Dry Oil, the Honey Bronze Drops Of Sun and the Highlighting Dome.


Now this product isn't to be confused with your bog standard fake tan because it doesn't give you that kind of intensity. Instead the oil leaves you with a more of a sun kissed shimmery tan which is a lot more subtle but much more realistic looking. I much prefer this instead of my normal tan because it leaves my skin feeling hydrated but doesn't leave a greasy feel like most oil based products do. Even though it is quite pricey I've found a little goes a long way so I reckon this product will last me quite a while and will be perfect to apply over a real tan in the summer!

2. Drops Of Sun - £12
This product can be mixed into anything... but preferably in moisturiser or foundation to give you a golden glow. I find this is perfect to use on my face after I've applied my shimmering dry oil so that my face actually matches the rest of my body! One of the things I love the most about this product is that it is shimmer free. I find a lot of bronzed face products contain shimmer which I find on me makes me look totally OTT but this one leaves me looking glowy as hell! Again this product will last me forever because one drop is more than enough.

I just couldn't resist yet another highlighter! I'm obsessed. The shade of this highlighter is 01 and reminds me of Mac Soft and Gentle but in a cream version (heaven I know). The shape of this product is perfect because I can just swipe the tops of my cheek bones so easily and it leaves a shimmery highlight. I also find this product to be easy to blend and for only £9 I've definitely been getting my moneys worth.

I can't wait to try more of The Body Shop's products as I've only just got into shopping there but I'm sure I'll be writing up another review on their stuff soon! I hope you enjoyed this post and I'd love to see some of your comments below<3

Love B x

Read More

Share Tweet Pin It +1

2 Comments

In 2017 bblogger beauty blog bloglovin fblogger followback followforfollow lblogger lifestyle personalblog thegirlgang

Blog switch up // The pill

Hello lovelies,

This post is going to be very different to anything I've posted on my blog before but I really want to start talking about real life situations and personal experiences because I absolutely love reading posts like this and find things like this can be super helpful. The other week I asked you guys on twitter if you'd like more personal blog posts and the majority voted yes, so I thought I'd kick this off with my month from hell thanks to the pill.

The contraceptive pill is something that thousands of women use and even though so many of us take it, it isn't something people really talk about. I was first put on the combined pill when I was 15 to help regulate my crazy periods. The doctor said it would make them lighter, shorter and less painful. How amazing?

For years I haven't even thought twice about being on the pill. I went to all of my check ups and did the usual weight, height and blood pressure checks and always walked away happy a larry with six more months of pills. This was until I was randomly put onto a different brand called Rigevidon. I was told by my nurse that my doctors have stopped stocking my original pill so this was the exact same ingredients and that everything would be the same. As much as this was true in the sense that the ingredients were the same, the quality of this pill was not and it made me feel AWFUL. 

Week one was full of mood swings and breakdowns. Week two was pretty much the same. I couldn't pin point what on earth was actually wrong with me but I just didn't feel good at all. And by week 3 I felt exhausted all of the time and the headaches and bloating I suffered from were insane. Me being me I decided to google my symptoms and see if anyone else has had the same problem and oh my god the internet was full of horror stories. Quick tip: Don't google symptoms EVER. It's never going to be good news!

 I finally decided to book an appointment with my new doctors who thankfully did stock my old pill but I was told to finish the packet before changing. I'm now back on my original pill which is Ovranette but I didn't skip my 7 day break like I should have. Woops... I've never really had any problems with this pill before and find I'm much more relaxed taking something I know I'm familiar with. 

My advice would be to go and talk to a nurse or doctor about any questions or concerns you have about contraception because it is perfectly normal to want to discuss your options. Nurses and doctors are there to help you and no matter what you want to ask they will try to help you.

I know this post is completely different to anything I've wrote on here before but topics like these are things I could ramble on about for days and I love reading stuff like this. So, every month I'm now going to be uploading a more wordy and personal blog post because I have so many things I want to speak about that normally just get swept under the carpet.

I hope you enjoyed reading my experience and remember that everyone has different experiences on the pill.

Love B x


Read More

Share Tweet Pin It +1

0 Comments

In 2016 autumn bblogger beauty beautyset favourites lblogger lifestyle lorealparis review thegirlgang

L'Oreal Pure Clay Masks // Review


Hello lovlies,

Face masks are something I've had a constant hit and miss kind of relationship with. With ridiculously sensitive skin I have to be super careful about what kind of masks I use. The days of sleepovers and boots own face masks were never good!!! So, because of the bad experiences I've had, I've never been the type of person to do weekly face masks. Until now.


The L'Oréal pure clay mask range are made up of three different kind of masks. A glow mask, a detox mask and a purity mask. I picked up the ones that suited my skin. When reading about the purity mask I felt it wouldn't benefit my skin so I went for the detox and glow masks. I've been altering the two on a weekly basis for the past month and have actually noticed some changes!

The detox mask is more liquid based than the glow one and doesn't contain any micro beads. The packaging is really informative so I 100% recommend you read it before purchasing! This mask deep cleanses your skin and I did find it made my skin feel very clean and fresh after using it. 

The glow mask was a lot thicker and contained micro beads to exfoliate. I found this mask made a lot more of a visible different to my skin. My skin looked and felt softer and brighter. It didn't feel too tight on my face and I didn't feel like I had to moisturise too much afterwards.

I would 100% recommend these masks to anyone who is looking at trying to incorporate face masks into their skins routine. They are normally £7.99 each but you can often find them on offer in either Boots or Superdrug!

Has anyone else tried these masks or any others recently? I'd love to read your thoughts!

Love B x 

Read More

Share Tweet Pin It +1

0 Comments

In 2017 bblogger blog bloglovin followforfollow lblogger lifestyle thegirlgang travel winter

Photo diary // Amsterdam


Hello lovelies,

My photo diary posts are my absolute fav to sit down and create so I thought I'd do another one on my quick New Years trip to Amsterdam. Me and boyfriend booked this trip back in November and I'd been desperate to go ever since. 

We only spent three days in this beautiful city but managed to get so many touristy things done! I loved taking photos of the streets and of our food ect. (watch out for a mouth watering pancake pic!) However, as I've said before I am by no means a professional photographer and all my photos were taken on my iPhone 6s. 

I hope you enjoy taking a look at some of the memories I have made and I hope to carry on blogging about my travels later on this year! 

Love B x

The beautiful canal during sunset

Brunch at a cute little cafe

Quick pit stop at an adorable coffee shop


A street snap on the way to the zoo!

Amsterdam's hard rock cafe!

Ice skating in front of the museums and the I Amsterdam sign

Entrance to the Vondel park

A very dark shot of me and my boyfriend inside the Ice Bar

Entrance to the Ice Bar

One of many beautiful shops in the city centre!

The best chips I have ever tasted!!!

The cheesiest, most touristy photo I could get!


One of many hot coffees (We are defo a coffee kinda couple...)

A gorgeous walk into the centre


Read More

Share Tweet Pin It +1

0 Comments

In 2016 bblogger beauty bloglovin hair haircare lblogger lifestyle thegirlgang winter

Hair transformation // Grey hair!


Hello lovelies!

This week I decided to chop my blonde locks off and go for a brand new look. Grey ombre!!! I absolutely love this look and want to thank my hairdresser so much for achieving it (even though she'll never read this...) because my hair was a total mess before she worked her magic on it.

After the hairdressers

I thought I'd do a blog post on how she achieved this look and how to maintain the grey, because it does tend to fade quite quickly and it does require you toning it at home yourself.

After a week


Before applying any grey dye to my hair I had blonde highlights put through my hair so that the colour/toner would take more. I had sliced foils put through so it was more natural looking. (Basically one layer highlighted, then the other not, then another highlighted)

After having the highlights done my hairdresser mixed a silver/blonde toner with Crazy Colours Granite hair dye. This was applied to wet hair and was applied all over. The dye was left on for about 20 minutes because I have thicker hair but you can wash the dye off in around 10-15 minutes if you have much lighter or thinner hair!

When it comes to maintaining the colour purple shampoo will become your best friend! I use an intensive shampoo and condition once a week and any other washes I just use the daily ones. On top of this I tone my hair by using the Granite hair dye and mix in some of the Silver hair dye just to dilute the colour. This is just my personal preference. For lighter hair you can just use the silver or if you prefer it darker just use granite!

I'd love to hear some of your tips for maintaining grey/silver hair in the comment section below!


*Disclaimer*
I know I have some explaining to do because I have fallen off the radar completely but blogging and drowning in uni work definitely took its toll on me and bloggers block was real! But I'm back and I have loads of drafts waiting to be publishing so watch this space.


Read More

Share Tweet Pin It +1

0 Comments

In 2016 bblogger beauty bloglovin followforfollow haul. corfu holiday lblogger lipstick makeup review revlon thegirlgang

Duty Free Got Me // Revlon Moisture Stay 5


One of the best things about going abroad is shopping in the duty free section. Every time I go I can't help but pick myself up something and this time I went all out. 

I've never been a dedicated user of Revlon products but these lipsticks really stood out for me. I loved the idea of having a full set and found the quality of the product looked high. The set came with five of the moisture stay lipsticks as well as a free super lustrous lipstick in the shade 'Blushed'.  Altogether the set was around £30 however, the set isn't available in the UK as I brought this in Lanzarote.

Top - bottom: Crimson, Buff, Toffee, 
Violet, Dusk and Blushed

The five moisture stay lipsticks definitely do exactly that. Moisturise. They are very glossy on the lips and don't dry the out at all. As they leave a shine on the lips it does mean the colour can be quite sheer on the nude colours. However, the shade is easily build-able. All of the shades are easily wearable for both day and night time looks. My favourite shade is 'Dusk' as it's the type of nude that looks like your own lips just better.

Has anyone else brought anything in duty free recently? I'd love to hear below!

Love Briar X

Read More

Share Tweet Pin It +1

2 Comments

Powered by Blogger.